How to Create Multiple Websites in Magento 2 with Different Domains
Magento 2 provides a powerful multi-website architecture that allows merchants and developers to run multiple websites from a single Magento installation. Each website can have its own domain, products, pricing, customers, and store configurations while sharing the same Magento codebase.
In this tutorial, we will configure two separate websites:
            http://localhost/m248/pub/


            http://localhost/m248/test/
Step 1: Install Magento 2 and Configure Primary Website
Install Magento 2 normally and configure your primary website domain. Ensure the storefront and admin panel are working correctly before creating additional websites.
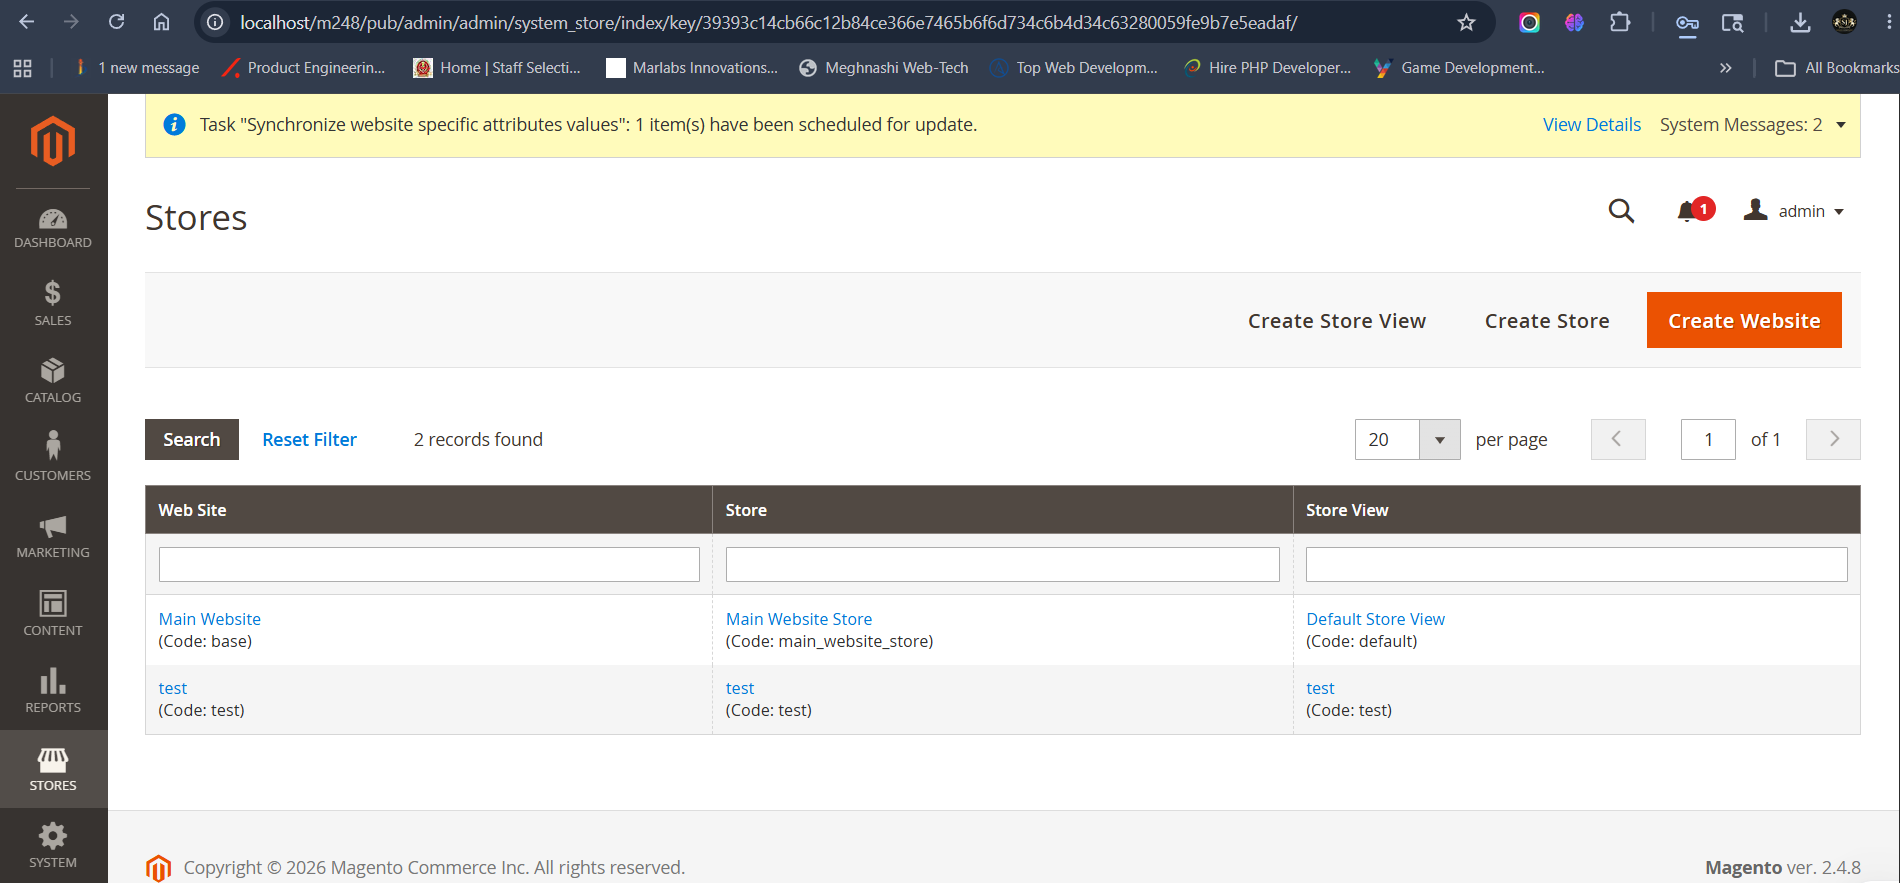
Step 2: Create Website, Store and Store View
Navigate to:
Stores → Settings → All Stores
Create a new Website, Store, and Store View for the test domain. Make sure you note down the Website Code because it will be used later.
Step 3: Open Magento Web Configuration
Navigate to:
Stores → Settings → Configuration → General → Web

Step 4: Select Test Website Configuration
Choose the test website from the store configuration dropdown.
Step 5: Configure Base URLs
Configure both Base URL and Secure Base URL:
http://localhost/m248/test/
Save the configuration and clear cache if required.
Step 6: Create Test Website Directory
Create a new folder inside your Magento root directory.
magento_root/test
Step 7: Copy Required Magento Files
Copy the following files from Magento root:
index.php
.htaccess
Paste both files into the newly created test directory.
Step 8: Modify index.php File
Replace the default bootstrap code with:
ln -s /home/example/example.com/html/app/ app

ln -s /home/example/example.com/html/lib/ lib

ln -s /home/example/example.com/html/pub/ pub

ln -s /home/example/example.com/html/var/ varTest with your actual Website Code configured
in Magento Admin.
Step 9: Update Bootstrap Path
Replace:
require __DIR__ . '/app/bootstrap.php';With:
require __DIR__ . '/../app/bootstrap.php';Step 10: Configure Domain Mapping
Point the test domain document root to:
/var/www/html/test
Step 11: Create Symlinks
Run the following commands from the test directory:
ln -s /home/example/example.com/html/app/ app

ln -s /home/example/example.com/html/lib/ lib

ln -s /home/example/example.com/html/pub/ pub

ln -s /home/example/example.com/html/var/ var
Step 12: Clear Cache
php bin/magento cache:flushVerify the Multi Website Setup
- Open the primary website domain.
- Open the test website domain.
- Verify products and configurations.
- Ensure SSL and static assets load correctly.
- Check admin website configuration.
Conclusion
Magento 2's multi-website architecture makes it possible to run multiple websites with different domains from a single Magento installation. By configuring websites, stores, base URLs, server mappings, and symlinks correctly, you can efficiently manage multiple storefronts while maintaining a centralized Magento backend.
How to Create Multiple Websites in Magento 2 with Different Domains
Magento 2 provides a powerful multi-website architecture that allows merchants and developers to run multiple websites from a single Magento installation. Each website can have its own domain, products, pricing, customers, and store configurations while sharing the same Magento codebase.
In this tutorial, we will configure two separate websites:
            http://localhost/m248/pub/


            http://localhost/m248/test/
Step 1: Install Magento 2 and Configure Primary Website
Install Magento 2 normally and configure your primary website domain. Ensure the storefront and admin panel are working correctly before creating additional websites.
Step 2: Create Website, Store and Store View
Navigate to:
Stores → Settings → All Stores
Create a new Website, Store, and Store View for the test domain. Make sure you note down the Website Code because it will be used later.
Step 3: Open Magento Web Configuration
Navigate to:
Stores → Settings → Configuration → General → Web
Step 4: Select Test Website Configuration
Choose the test website from the store configuration dropdown.
Step 5: Configure Base URLs
Configure both Base URL and Secure Base URL:
http://localhost/m248/test/
Save the configuration and clear cache if required.
Step 6: Create Test Website Directory
Create a new folder inside your Magento root directory.
magento_root/test
Step 7: Copy Required Magento Files
Copy the following files from Magento root:
index.php
.htaccess
Paste both files into the newly created test directory.
Step 8: Modify index.php File
Replace the default bootstrap code with:
$params = $_SERVER;

$params[\Magento\Store\Model\StoreManager::PARAM_RUN_CODE] = 'test';

$params[\Magento\Store\Model\StoreManager::PARAM_RUN_TYPE] = 'website';

$bootstrap = \Magento\Framework\App\Bootstrap::create(BP, $params);

$app = $bootstrap->createApplication('Magento\Framework\App\Http');

$bootstrap->run($app);Test with your actual Website Code configured
in Magento Admin.
Step 9: Update Bootstrap Path
Replace:
require __DIR__ . '/app/bootstrap.php';With:
require __DIR__ . '/../app/bootstrap.php';Step 10: Configure Domain Mapping
Point the test domain document root to:
/var/www/html/test
Step 11: Create Symlinks
Run the following commands from the test directory:
ln -s /home/example/example.com/html/app/ app

ln -s /home/example/example.com/html/lib/ lib

ln -s /home/example/example.com/html/pub/ pub

ln -s /home/example/example.com/html/var/ var
Step 12: Clear Cache
php bin/magento cache:flush
Verify the Multi Website Setup
- Open the primary website domain.
- Open the test website domain.
- Verify products and configurations.
- Ensure SSL and static assets load correctly.
- Check admin website configuration.
Conclusion
Magento 2's multi-website architecture makes it possible to run multiple websites with different domains from a single Magento installation. By configuring websites, stores, base URLs, server mappings, and symlinks correctly, you can efficiently manage multiple storefronts while maintaining a centralized Magento backend.